Introduction to Textures in Modern OpenGL
Table of Contents
Textures are a fundamental concept in 3D graphics programming, allowing you to apply images to 3D models, making them look more realistic and detailed. In this guide, we will explore the basics of textures in OpenGL, including how to create, bind, and use them in your applications.
What is a Texture? #
In principle, textures are simply arrays of data. They can represent images, colors, shadow maps, or any other data you want to map to a 3D object. In OpenGL, textures are typically represented as 2D or 3D arrays of pixels, where each pixel can have one or more color channels (e.g., RGB, RGBA).
In this tutorial, we will focus only on the color aspect to map the pixels of an image onto our rectangular surface.
Prerequisites #
Before diving into textures, you should have a basic understanding of OpenGL and how to set up a rendering context. You should also be familiar with C++ programming and the use of libraries like GLFW and GLEW for window management and OpenGL function loading. Check out my OpenGL tutorial to quickly get up to speed with these libraries and draw your first geometry:
If you want even more, here’s the full playlist with all my FREE tutorials related to OpenGL: Modern OpenGL Tutorial Series
Starting Code #
Here’s our starting code that draws a simple rectangle on the screen. After watching the above tutorial, you should be familiar with the steps needed to implement that, but let’s review them quickly:
- Define the vertex and fragment shaders. The vertex shader simply passes the vertex position to the fragment shader, while the fragment shader colors the pixel with a solid color
- Define the vertex data for a rectangle, consisting of two triangles described in OpenGL coordinates
- Start the main function with initializing the GLFW window library and creating a window
- Initialize GLEW to load OpenGL functions
- Compile the shaders and link them into a program
- Create a vertex buffer object (VBO) and a vertex array object (VAO) to store the vertex data
- Draw the geometry in a loop until the user closes the window
- Clean up resources and exit
#include <GL/glew.h>
#include <GLFW/glfw3.h>
#include <print>
#include <array>

// --- 1 ---
constexpr auto vertexShaderSource = R"(
    #version 330 core

    layout (location = 0) in vec2 aPos;

    void main()
    {
        gl_Position = vec4(aPos.x, aPos.y, 0.0, 1.0);
    }
)";

constexpr auto fragmentShaderSource = R"(
    #version 330 core

    out vec4 FragColor;

    void main()
    {
        FragColor = vec4(1.0f, 0.5f, 0.0f, 1.0f);
    }
)";

[[nodiscard]]
bool tryCompileShaderWithLog(GLuint shaderID);

[[nodiscard]]
bool tryLinkProgramWithLog(GLuint programID);

// --- 2 ---
constexpr auto quadVertices = std::array{
    -0.5f, -0.5f,
     0.5f, -0.5f,
     0.5f,  0.5f,

     0.5f,  0.5f,
    -0.5f,  0.5f,
    -0.5f, -0.5f
};


int main() {

    // --- 3 ---
    if (!glfwInit()) {
        std::println("Failed to initialize GLFW");
        return -1;
    }

    glfwWindowHint(GLFW_CONTEXT_VERSION_MAJOR, 3);
    glfwWindowHint(GLFW_CONTEXT_VERSION_MINOR, 3);
    glfwWindowHint(GLFW_OPENGL_PROFILE, GLFW_OPENGL_CORE_PROFILE);

#ifdef __APPLE__
    glfwWindowHint(GLFW_OPENGL_FORWARD_COMPAT, GL_TRUE);
#endif

    const auto* videoMode = glfwGetVideoMode(glfwGetPrimaryMonitor());

    const int screenWidth  = videoMode->width;
    const int screenHeight = videoMode->height;

    const int windowWidth  = screenHeight / 2;
    const int windowHeight = screenHeight / 2;

    auto* window = glfwCreateWindow(screenHeight / 2, screenHeight / 2,
                                    "OpenGL + GLFW", nullptr, nullptr);
    if (window == NULL) {
        std::println("Failed to create GLFW window");
        glfwTerminate();
        return -1;
    }

    // Calculate center position
    int windowPosX = (screenWidth - windowWidth) / 2;
    int windowPosY = (screenHeight - windowHeight) / 2;

    // Center the window
    glfwSetWindowPos(window, windowPosX, windowPosY);

    glfwSetWindowAspectRatio(window, 1, 1);
    glfwMakeContextCurrent(window);

    // --- 4 ---
    if (glewInit() != GLEW_OK) {
        std::println("Failed to initialize GLEW");
        glfwTerminate();
        return -1;
    }

    // --- 5 ---
    auto vertexShader = glCreateShader(GL_VERTEX_SHADER);
    glShaderSource(vertexShader, 1, &vertexShaderSource, nullptr);

    if (!tryCompileShaderWithLog(vertexShader)) {
        glfwTerminate();
        return -1;
    }

    auto fragmentShader = glCreateShader(GL_FRAGMENT_SHADER);
    glShaderSource(fragmentShader, 1, &fragmentShaderSource, nullptr);

    if (!tryCompileShaderWithLog(fragmentShader)) {
        glfwTerminate();
        return -1;
    }

    auto shaderProgram = glCreateProgram();
    glAttachShader(shaderProgram, vertexShader);
    glAttachShader(shaderProgram, fragmentShader);

    if (!tryLinkProgramWithLog(shaderProgram)) {
        glfwTerminate();
        return -1;
    }

    glDeleteShader(vertexShader);
    glDeleteShader(fragmentShader);

    // --- 6 ---
    GLuint VAO, VBO;

    glGenVertexArrays(1, &VAO);
    glGenBuffers(1, &VBO);

    glBindVertexArray(VAO);
    glBindBuffer(GL_ARRAY_BUFFER, VBO);
    glBufferData(GL_ARRAY_BUFFER, sizeof(quadVertices), quadVertices.data(),
                 GL_STATIC_DRAW);

    glVertexAttribPointer(0, 2, GL_FLOAT, GL_FALSE, 2 * sizeof(float), (void*)0);
    glEnableVertexAttribArray(0);

    glClearColor(0.0f, 0.0f, 0.0f, 1.0f);

    // --- 7 ---
    while (!glfwWindowShouldClose(window)) {

        int fbWidth, fbHeight;
        glfwGetFramebufferSize(window, &fbWidth, &fbHeight);
        glViewport(0, 0, fbWidth, fbHeight);

        glClear(GL_COLOR_BUFFER_BIT);
        glUseProgram(shaderProgram);
        glBindVertexArray(VAO);
        glDrawArrays(GL_TRIANGLES, 0, 6);

        glfwSwapBuffers(window);
        glfwPollEvents();

        if (glfwGetKey(window, GLFW_KEY_Q) == GLFW_PRESS) {
            glfwSetWindowShouldClose(window, true);
        }
    }

    // --- 8 ---
    glDeleteProgram(shaderProgram);
    glDeleteBuffers(1, &VBO);
    glDeleteVertexArrays(1, &VAO);

    glfwTerminate();
    return 0;
}

bool tryCompileShaderWithLog(GLuint shaderID) {
    glCompileShader(shaderID);
    GLint success = 0;
    glGetShaderiv(shaderID, GL_COMPILE_STATUS, &success);
    if (success == GL_FALSE) {
        char log[1024];
        glGetShaderInfoLog(shaderID, sizeof(log), nullptr, log);
        std::println("Shader compilation failed:\n{}", log);
        return false;
    }
    return true;
}

bool tryLinkProgramWithLog(GLuint programID) {
    glLinkProgram(programID);
    GLint success = 0;
    glGetProgramiv(programID, GL_LINK_STATUS, &success);
    if (success == GL_FALSE) {
        char log[1024];
        glGetProgramInfoLog(programID, sizeof(log), nullptr, log);
        std::println("Program linking failed:\n{}", log);
        return false;
    }
    return true;
}
Setting Up the Texture #
Now we need to extend this program to support textures. We’ll make minimal changes, adding only a few lines.
Loading the Image Data to a Texture object #
The first thing we need is image data. For this tutorial, we will use a simple crate texture.
A popular image loading library, known as STB, provides a simple way to load images into memory. This is a single-header library, which we download automatically with CMake using FetchContent:
include(FetchContent)

FetchContent_Declare(
  stb
  GIT_REPOSITORY https://github.com/nothings/stb.git
  GIT_TAG master
)

FetchContent_MakeAvailable(stb)
Click here for the full contents of our CMake script: CMakeLists.txt.
At the beginning of the main.cpp file, we include the STB header. The preprocessor directive #define STB_IMAGE_IMPLEMENTATION ensures that the header contains also definitions, not just declarations. This is a common pattern for single-header libraries.
#define STB_IMAGE_IMPLEMENTATION
#include <stb_image.h>
Now we need to create the texture object. Include the following code just after glEnableVertexAttribArray(0); in the main() function:
GLuint texture;
glGenTextures(1, &texture);
glBindTexture(GL_TEXTURE_2D, texture);

glTexParameteri(GL_TEXTURE_2D, GL_TEXTURE_MIN_FILTER, GL_LINEAR);
Like with other OpenGL objects, we need to generate an ID. We then bind the texture to the GL_TEXTURE_2D target, which tells OpenGL that we want to work with a 2D texture. Also, because of this binding, the subsequent calls to glTexParameteri and glTexImage2D will affect this texture.
Talking about glTexParameteri, we set the texture minification filter to GL_LINEAR. This means that when the texture is displayed smaller than its original size, OpenGL will use linear interpolation to smooth the pixels. This also disables mipmapping, which is a topic for another tutorial (we keep it simple for now).
The following code uses the STB library to load the image data from a file called crate.png. Make sure this file is in the same directory as your executable or provide the full path to it.
int textureWidth, textureHeight, nrChannels;
stbi_set_flip_vertically_on_load(true);

unsigned char* data = stbi_load("crate.png", &textureWidth,
                                &textureHeight, &nrChannels, 0);

if (data) {
    auto format = nrChannels == 4 ? GL_RGBA : GL_RGB;
    glTexImage2D(GL_TEXTURE_2D, 0, format, textureWidth,
                 textureHeight, 0, format, GL_UNSIGNED_BYTE, data);
}
else {
    std::println("Failed to load texture");
}

stbi_image_free(data);
This code loads the image data into a pointer called data. The stbi_set_flip_vertically_on_load(true); function call ensures that the image is flipped vertically, as OpenGL uses a different coordinate system than most image formats.
The glTexImage2D function uploads the image data to the GPU. This call may look scary at first, but it is actually quite simple. The first parameter specifies the target texture type, which is GL_TEXTURE_2D in our case. The second parameter is the mipmap level, which we set to 0 as we don’t use mipmapping in this tutorial. The third parameter is the internal format of the texture, which we set to GL_RGBA if the image has 4 channels (RGBA) or GL_RGB if it has 3 channels (RGB). The next two parameters specify the width and height of the texture, followed by the border size (OpenGL legacy stuff, we set it to 0). The next two parameters specify the format and type of the pixel data, which we set to GL_UNSIGNED_BYTE for 8-bit color channels. Finally, we pass the image data pointer data to the function.
We need to update our shaders as well, but first we need to understand texture coordinates.
Texture Coordinates #
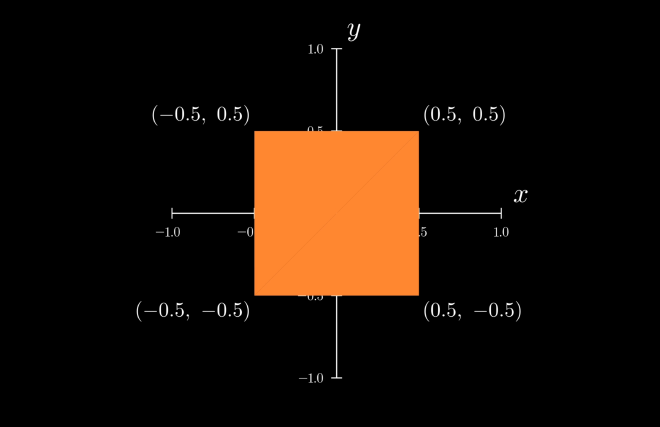
Our quad is defined in OpenGL coordinates. The bottom left corner is at (-0.5, -0.5) and the top right corner is at (0.5, 0.5).

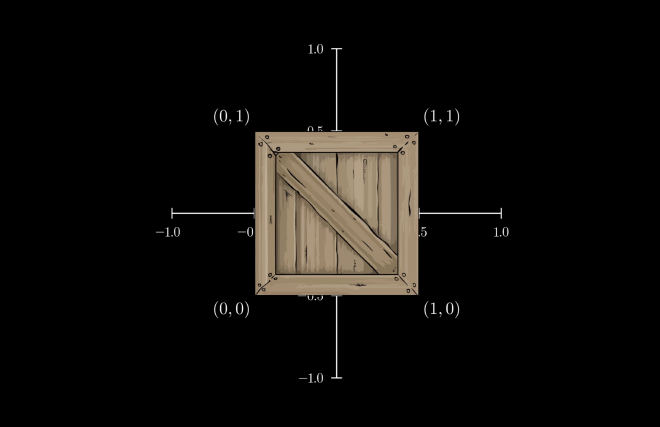
OpenGL texture coordinates are defined in a different way. The bottom left corner is at (0, 0) and the top right corner is at (1, 1).

To map the texture correctly, we need to define the texture coordinates for each vertex of the quad. Our quadVertices array will now look like this:
constexpr auto quadVertices = std::array{
    // positions     // texture coords
    -0.5f, -0.5f,   0.0f, 0.0f,
     0.5f, -0.5f,   1.0f, 0.0f,
     0.5f,  0.5f,   1.0f, 1.0f,

     0.5f,  0.5f,   1.0f, 1.0f,
    -0.5f,  0.5f,   0.0f, 1.0f,
    -0.5f, -0.5f,   0.0f, 0.0f
};
Vertex Attributes #
Of course, we need to update the vertex attributes to include the texture coordinates. The stride for the vertex positions will now be 4 * sizeof(float), because we need to jump over two floats describing the position and another two floats describing the texture coordinates, in order to get to the next vertex position.
So our glVertexAttribPointer call for the position attribute will look like this:
glVertexAttribPointer(0, 2, GL_FLOAT, GL_FALSE, 4 * sizeof(float), (void*)0);
glEnableVertexAttribArray(0);
And we need to add another one for the texture coordinates. It will start at an offset of 2 * sizeof(float) from the start of the vertex data, and it will have a stride of 4 * sizeof(float) as well:
glVertexAttribPointer(1, 2, GL_FLOAT, GL_FALSE, 4 * sizeof(float),
                      (void*)(2 * sizeof(float)));
glEnableVertexAttribArray(1);
Shaders #
Next, we need to update our shaders to handle textures. The vertex shader will remain mostly unchanged, but we need to pass the texture coordinates to the fragment shader.
constexpr auto vertexShaderSource = R"(
    #version 330 core

    layout (location = 0) in vec2 aPos;
    layout (location = 1) in vec2 aTexCoord;

    out vec2 TexCoord;

    void main()
    {
        gl_Position = vec4(aPos.x, aPos.y, 0.0, 1.0);
        TexCoord = aTexCoord;
    }
)";
In the fragment shader, we create a sampler2D uniform to access the texture. It is used with the texture function call which returns the correct image color value for the given texture coordinate.
constexpr auto fragmentShaderSource = R"(
    #version 330 core

    out vec4 FragColor;

    in vec2 TexCoord;
    uniform sampler2D texture1;

    void main()
    {
        FragColor = texture(texture1, TexCoord);
    }
)";
Passing the texture to sampler2D #
That’s the final part of the puzzle. It is a bit tricky, though, as it involves something called Texture Units. In short, to use a texture in a shader, we need to:
- Set our sampler uniform to the texture unit we want to use (by passing an integer to it, representing the texture unit index)
- Activate the texture unit with
glActiveTexture - Bind the texture with
glBindTexture. This will associate the texture with the currently active texture unit.
Before the render loop, add:
glUseProgram(shaderProgram);
glUniform1i(glGetUniformLocation(shaderProgram, "texture1"), 0);
And then:
glActiveTexture(GL_TEXTURE0);
glBindTexture(GL_TEXTURE_2D, texture);
Cleaning Up #
Finally, we need to clean up the texture object at the end of the program. Just before glDeleteProgram(shaderProgram);, add:
glDeleteTextures(1, &texture);
And that’s it! Build and run the program, and you should see the rectangle textured with the crate image. Congratulations, you have successfully implemented textures in OpenGL!
Final Code #
If you ran into trouble following the tutorial, you can find the final code here: gl_textures_tutorial. Just clone the repo and build it with CMake. The code will work on Windows, Mac and Linux without any changes:
cmake -S . -B build
cmake --build build
You will find the executable in the build directory, ready to run. Make sure you have the crate.png image in the same directory as the executable, or adjust the path in the code accordingly. Enjoy!
If you like this type of content, consider subscribing to my YouTube channel for more tutorials and tips on OpenGL and C++ programming. Happy coding!